B142-Lab Assessment Sheet |
Student
Name: Jessica Rush
Assessment Topic: Windows XP Configuration
Getting Started: What You Need
*Legal
Windows XP Disk

NOTE:
Pirating software is a crime, Use a legal disk to avoid criminal charges.
Things to do:
1.
Change folder options to view all file types
2.
Change
the view of the control panel to classic
3.
Configure
the log on screen to the classic, more secure method
4.
Change
the network name to the one provided on the machine
5.
Change
the workgroup name to the one provided on the machine
6.
Verify
network connection using the netsh command
7.
Change
IE title bar in the registry to display B142.com
8.
Change
the automatic updates settings to automatic download and install
9.
Make
a username for yourself that’s a Power User through Manage.
10.
Change
Messenger Service Manual
11.
Change
Administrator name to Admin through Manage
12.
Verify
that File and Print Sharing is installed selected
13.
Create
a shared network folder in the root of the system partition with “your name share” as the name
- Change folder options to view all file types –
Click on
start button
|
 |
 |
Click on
Control Panel
|
Double
click on Folder options
|
 |
Select the
view tab
|
|
Scroll down
to Hidden Files and Folders
|
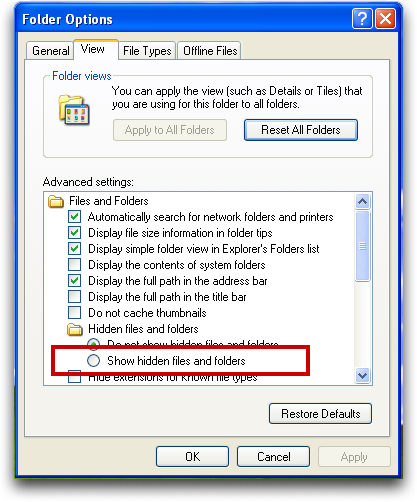 |
Select show
hidden files and folders
We were to show all hidden stuff, including
system files.
|
2.
Change
the view of the control panel to classic
In Control
Panel-File Option:
Select the
General tab
|
 |
 |
Select Use
Windows classic folders
|
3.
Configure
the log on screen to the classic, more secure method
In Control
Panel:
Double
click on User Accounts
|
 |
 |
Click on
Change the way users log on or off
|
Check only
Use the Welcome screen
|
 |
4.
Change
the network name to the one provided on the machine
Click on "Start." Right-click on "My Computer." Left-click on "Properties."
|
 |
 |
Click the "Computer Name" tab in the "System Properties" box.
|
Type in
b142
|
5.
Change
the workgroup name to the one provided on the machine
Click on
start button
|
|
|
Right click
on My Computer
|
Select
Properties
|
|
|
Click on
Computer Name tab
|
Click on
change…
|
|
Type in
Comp08 in the workgroup
‘workgroup’ was supposed to go in here rather
than COMP08 <– that was to go into step #4
|
6.
Verify
network connection using the netsh command
Click on
start button
|
|
 |
Click on
run
|
Type in CMD
|
|
 |
Type in cd
.. until you reach (c:)
|
Type in
netsh
|
 |
Type in
show mode
netsh diag show test
|
7.
Change
IE title bar in the registry to display B142.com
Click on
start button
|
|
|
Click on
run
|
Type in
REGEDIT
|
 |
 |
Go to
HKEY_CURRENT_USER\Software\Microsoft\InternetExplorer\Main
|
Right click
|
|
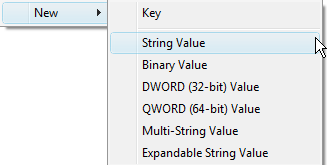 |
Select New String Value
|
Name it
Window Title
|
|
Right click
on string value
|
|
Select
modify
|
 |
Type in
B142.com into Value data
|
8.
Change
the automatic updates settings to automatic download and install
Click on
Start Button
|
|
| |
Right click
on My computer
|
Select
Properties
|
|
 |
Select
Automatic Updates
|
Click on
Automatic
|
 |
9.
Make
a username for yourself that’s a Power User through Manage.
Click on
Start Button
|
|
|
Right click
on My Computer
|
Select
Manage
|
 |
Click on
Local Users and Groups
|
 |
Click on
Users
|
|
Right click
and select New User…
|
 |
Type in User Name and info. |
|
Then click on Groups |
|
 |
Double
click on Power Users
|
Click add… button |
|
Enter user name |
10.
Change
Messenger Service Manual
From
manage:
Click on
services and applications
|
 |
 |
Click on
services
|
Find
Messenger double click on it
|
 |
 |
Under
startup type scroll down to Manual and select it – then click ok
|
11.
Change
Administrator name to Admin through Manage
From
manage:
Click on
Local Users and Groups
|
 |
 |
Click on
Users
|
Right click
on Administrator
|
 |
Select Rename |
|
Type in Admin |
12. Verify that File and Print Sharing is installed selected
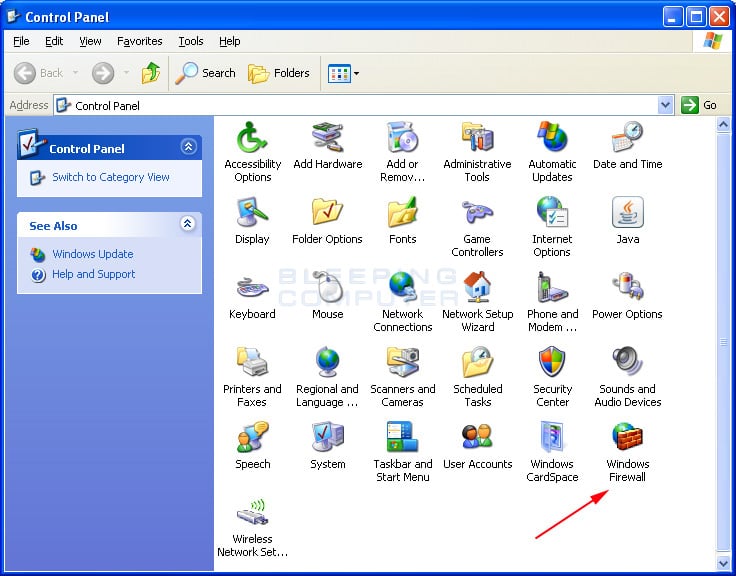
Click on
the start button
|
|
 |
Click on
control panel
|
Double
click on windows firewall
|
 |
 |
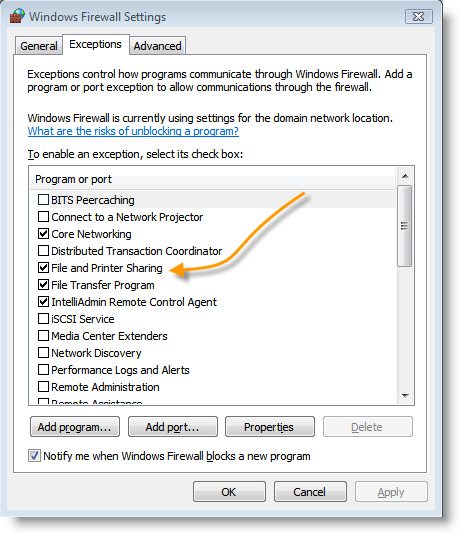
Select the
exceptions tab
|
Check File
and Printer Sharing
|
 |
13.
Create
a shared network folder in the root of the system partition with “your name share” as the name
Click on the
start button
|
|
 |
Click on My
computer
|
Double
click on local disk
|
 |
Right click and select New |
|
Select
Folder
|
 |
Name the folder “your name share” |
|
Right click on the folder |
|
 |
Click on
properties
|
Select the
sharing tab
|
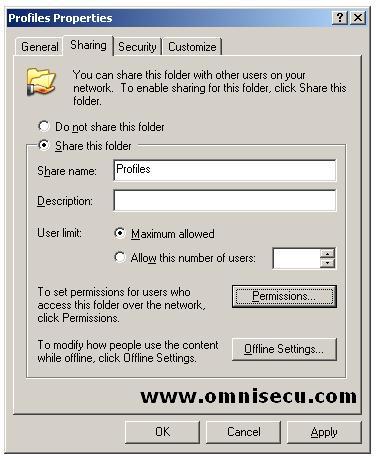 |
Select share this folder |
If you had to
do some troubleshooting, briefly state what the problem was and your solution
for it.
Assessed
by: ___________________________ Date:
_______________
Assessed
by: ___________________________ Date:
_______________
Pretty good. You might want to rethink the
left/right-table thing – maybe number the steps. Need a bit more accuracy and
detail
Score = 25
No comments:
Post a Comment